
Tutorial - How to prepare and sew your zipper so you don't have dented corners at the top
- Gena Cunha
- Oct 25, 2017
- 3 min read
I have learned a long time ago "my" perfect way of doing the zippers so I don't have dented corners at the top. I will show you how to do it in this short tutorial. This is a excert of the Sarys zipper pouches pattern.


1 - Prepare you zipper tab
Cut a piece of fabric 1 1/2" x 1 1/2". Take this fabric piece, and fold in half, joining 2 raw edges WS together, press to create a crease. Open up the tab and press “in” both halves towards the centre crease WS together and press. Fold in half again along original crease and press. You should now have 1 zipper tab that is 3/8 (h) x 1 1/2” (w).
2 - Prepare your zipper
- Take the zipper and cut off the bottom zipper stop. Optional : apply a bit of glue on both sides of the zipper tape on that end.
- Take the zipper tab and place the cut end of the zipper into the centre crease of the zipper tab. Clip and let the glue dry, if using any. Stitch the tab to the zipper at 1/8”. Trim the zipper tab so it is the same width of the zipper tape.
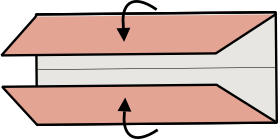
- Close the zipper completely. Measure from the end of the zipper tab towards the top (zipper pull side) and make a mark with a pen on both sides on the RS of the tape (DO NOT CUT). Your zipper should always measure at least 1" shorter than the piece of fabric where you are going to sew it.


- Slide the zipper pull back until the top of the pull is even with the marks.
- Pinch the mark on the zipper tape on one side and fold back at a 90 degree angle, hand or machine stitch the end in place. Repeat to the other side, making sure that both folds are aligned. .
- Trim the ends off so they are flush with the zipper tape.


3 - Sew the zipper
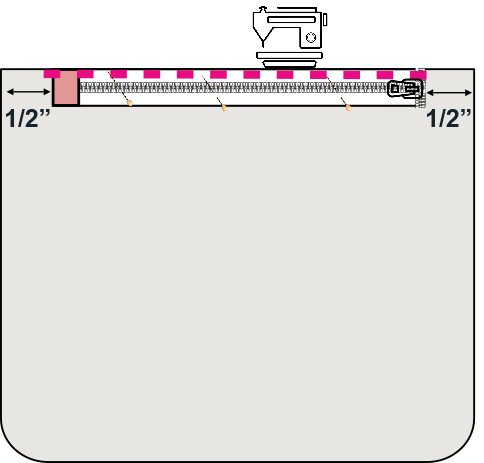
- Take one of lining pieces and lay it RS up on the table. Using a ruler, mark on the top straight edge the zipper placement - 1/2” at each side raw edges. Take the zipper and place it RS up between the marks with the zipper pull on your right, aligning the top zipper tape with the top raw edge of the lining. Glue baste OR pin/clip and sew baste the zipper to the fabric at 1/8”.
- Take exterior piece and place it WS up on top of the lining piece, aligning the top raw edges of both pieces. Pin/clip or glue baste. The zipper will be sandwiched between the 2 fabrics. Stitch at 1/4” along the top edge with a zipper foot.


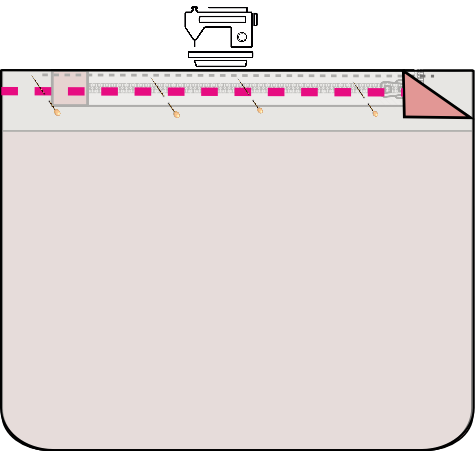
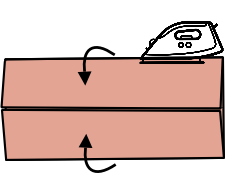
- Open the fabric pieces away from each other, making sure the SA is towards the lining side and press. Topstitch at 1/8" next to the zipper on the lining side, make sure to catch under the zipper SA.
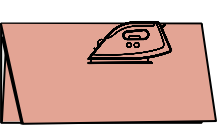
*You can instead place the SA towards the exterior and topstitch on the exterior fabric, leaving the lining unstitched, in that case you will have to press extra carefully the lining away from the zipper tape, so you don’t have the problem we where avoiding by stitching on the lining side (the lining catching on the zipper teeth).

- Repeat previous steps to attach the remaining lining and exterior piece to the other side of the zipper tape
- Sew your zipper pouch by joining the 2 exterior as lining fabrics RS togheter. When passing the zipper sides, make sure you don't catch the zipper tab on the Seam Allowence.
TIP : If having trouble sewing a perfect SA when passing the sides on the zipper area, use a zipper foot.
This way you will end up with your zipper corners like on the photos above!


Is this site still active do you have a YouTube of making this pouch please?
What if I don't want to use any zipper tabs at all, what I still be able to get corners that are not dented on both sides?